Document Management
OBJECTIVE
The Document Management option is used to centralize and organize various documents for a customer, project, supplier, order, etc. It is also the option that allows the user to enter and view any document related to certifications for Bill 28 (Attestation de Revenu Québec).
This option allows the user to create documents in different formats and make them available to users with access to the option. The documents are stored in a maestro* database and are not accessible via the network.
|
Only documents which respect the list of permitted extensions in maestro* (and maestro*MOBILE if applicable) can be added to the Document Management. The extension list is defined in the General Settings, Documents tab. |
Document Management is accessible from any of the Maintenance screens (Customer Management, Supplier Management, Human Ressources Files, etc.) and from transaction screens by clicking the Documents icon.
Document Management can be used with or without the Contact Management module.
PREREQUISITES
- Define Document Categories
- Security Management - Access Restriction - Documents
- General Settings - General and Documents section
Icons


Steps
Sections of the Document Management window
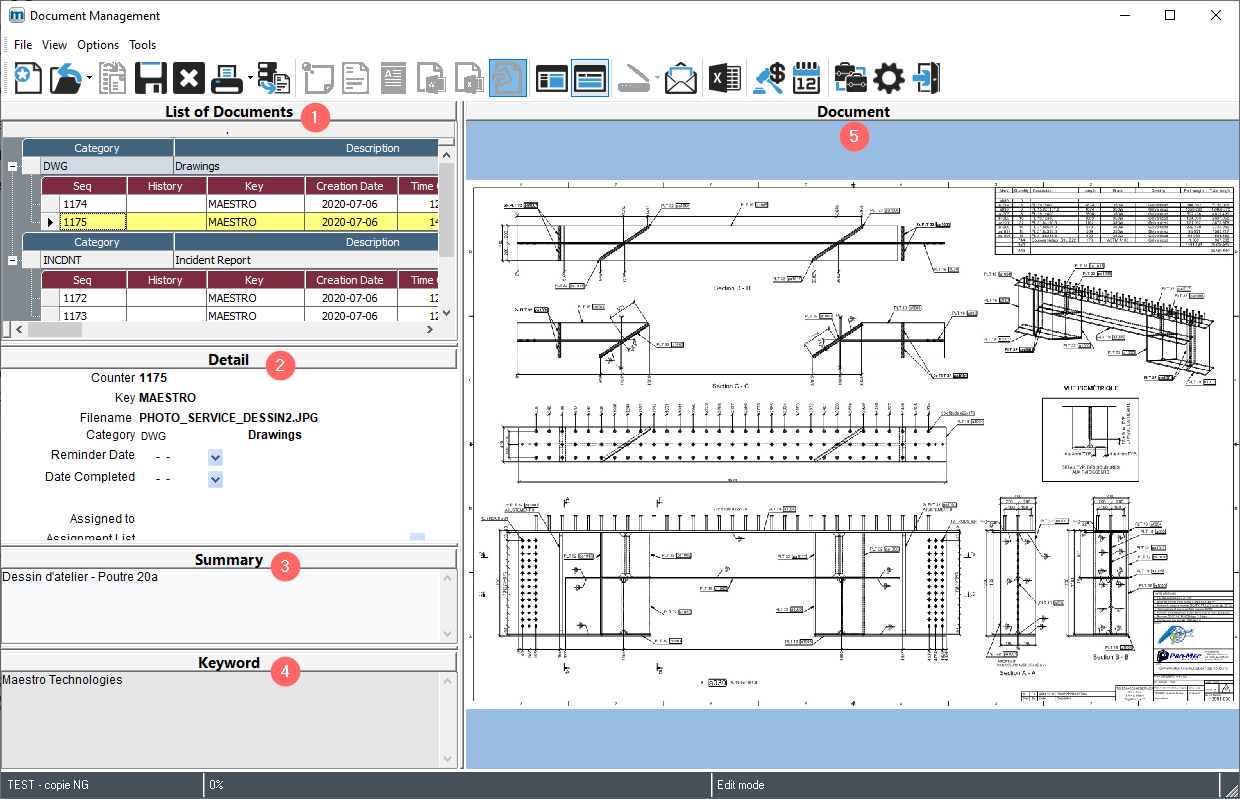
Document Management is broken down into five (5) sections:
|
Sections |
Description |
|---|---|
|
List of Documents |
This section shows the documents stored for a transaction in Document Management. By default, the documents are classified by document category. NOTE: You can customize the display by clicking the Display Related Documents icon. |
|
Detail |
This section identifies the document for the purpose of classifying and facilitating searching. |
|
Summary |
This section displays a summary of the document created to facilitate searching. |
|
Keyword |
This section displays the defined keywords for the document from the Define Keywords option of the Tools menu of the window. |
|
Document |
This section is used to change or view the document directly depending on the application used and the user's access rights.
|
|
|
The sections can be moved on the screen according to the user's preferences by clicking the section headings and moving around with the mouse. |
Create a document in Document Management
- Click on the appropriate icon, based on the format of the document that is created:
- Enter the required information in the Detail section:
Field
Description
Counter
Counter number from Document Management automatically attributed by maestro*.
Key
Internal key used to identify the source of the document for information purposes.
Filename
Filename assigned by maestro*.
Category
Category from Define Document Categories used to classify the documents.
NOTES: If a Template or Document Form was configured in Define Document Categories, maestro* displays the Do you want to create a new document from the template? message. Answer Yes to create a document.
Reminder Date
The date on which the user wants to follow up.
NOTE: When entering a reminder date, the document will be visible in the maestro* Events Calendar. It is possible to filter the documents based on the reminder date in Document Inquiry and Customer Documents.
Date Completed
Date on which a document was completed.
NOTE: It is possible to filter the documents based on the date completed in Document Inquiry and Customer Documents.
Assigned to
Used to assign the document to a user’s Events Calendar.
NOTES: The document will be assigned and visible in the Events Calendar.
If the Notify user by email when a document is assigned box is checked in Security Management (Access Restrictions tab, Documents section), the identified user will automatically receive an email when they have an assigned document.
Assignment List
Used to assign a document to multiple users.
NOTES: The document will be assigned and visible in the Events Calendar.
If the Notify user by email when a document is assigned box is checked in Security Management (Access Restrictions tab, Documents section), the identified users will automatically receive an email when they have an assigned document.
Search Tag 1 to 3
Used to enter keywords for identifying the document and for conducting quick searches in Document Inquiry.
Modification Date
Displays the date the document was last modified.
Include in Mass Mailings
Used to include the document in Mailing Management.
NOTES: The document remains available for mailings as long as the box is checked.
When the box is checked and the document is added to one of the Mailing Configuration options, it will be included into the list of transmitted document.
Document Type
Available values:
None
Is not a specific document type.
EDI
The document is an electronic data interchange document generated by the Cortex and ITCAN interfaces. There is no other functionality related to this field.
Table
Indicates to which transaction this document is linked.
NOTE: The following field is for informational purpose only; it cannot be modified.
- Click Save.
See also
